In the last two posts I described an environment installation and the first project generation. I used Eclipse as IDE. I want to be honest, I don't like Eclipse. It's very slow and sometimes buggy. So, I decided to show how to move to Qt Creator.
In this post you need to download Qt Creator from its site: https://www.qt.io/ide/ or install it with your software manager, in debian:
apt-get install qtcreator.
But be aware, that repositories may contain not the last version of the IDE.
Creating a build configuration.
Let's take our previous project. Now let's open qt-creator and select 'File->New File or Project...' Then, select 'Import Project → Import existing Project'. After that step we should choose a location of our project. In the next window we should select all our files. Also, you should add to the file selection filter fields Makefile; makefile; *.ld;
to add our makefile and linker script. After completing the import, we will have our project in Qt Creator Project tree.
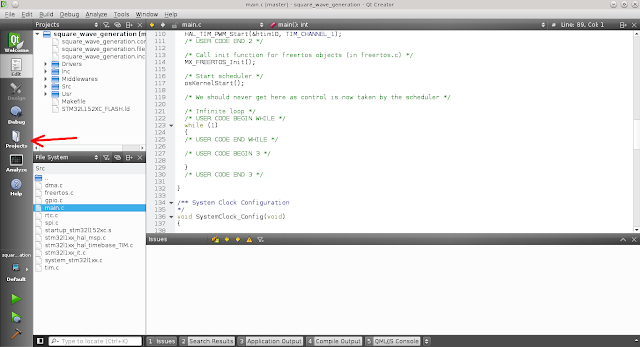
The next step is to build our project. We should go to the Tab Projects:
and make our build and clean steps look like this:
Now, we can compile our project!
Debugging the project.
In this step we should go to 'Tools->Options...->Build & Run->Debuggers' and create a new debugger with /usr/bin/arm-none-eabi-gdb in Path (you may have a different name for the tool):
Also, go to 'Tools->Options...->Debugger->GDB' and add the command 'load' to Additional Attach Commands:
After that, we should go to the 'Kits' tab and create a new kit:
Please, make sure that you have chosen the appropriate debugger.
Now we can debug our application.
First of all, we should connect to our board with OpenOCD debugger:
openocd -f board/stm32ldiscovery.cfg
Then, we should go to 'Debug->Start Debugging->Attach to Remote Debug Server'. In the new window we should choose our created Kit, insert server port number — 3333, server address — localhost, choose our executable, and provide its name as a command line argument:
After the debugger started, you should obtain a similar picture:
Now you can debug your program in Qt Creator using an OpenOCD debugger as a debugging server and gdb in a remote debugging mode. You can make sure, that you have an appropriate configuration, by starting a debug session and obtaining the same square wave like in the previous post.


No comments:
Post a Comment